ESP32 Resources
Getting Started on Random Nerds Website - PDF Version
Pinout Guide on Random Nerds Website - PDF Version
Freenove ESP32 CAM Board - (Ask if you're interested in the MicroBlocks project to go with this ESP32 camera)
HuskyLens - An easy-to-use AI machine vision sensor that works with MicroBlocks
ESP32 Tips and Tricks for MicroBlocks
(Re-)Programming an ESP32 to Work with MicroBlocks
- Hold down the tiny "BOOT" button while plugging the ESP32 into the computer USB port
- In MicroBlocks go under the "gear" menu, select "advanced mode," then go under the "gear" menu again and select "erase flash and update firmware on ESP32."
- Wait for the reprogramming to finish before doing anything else (don't switch tabs in Chrome or run another program).
- Unplug the ESP32 and plug it in again before you click on the "Connect" button.
- If this doesn't work, try doing a "factory reset" first and then repeat the procedure above.
- The easiest way to do this is with was this "factory reset" tool from Adafruit. It requires using the Google Chrome browser and holding down the "Boot" button on the ESP32 until the tool connects. Then clicking the "Erase" button completely resets the ESP32.
More Tips
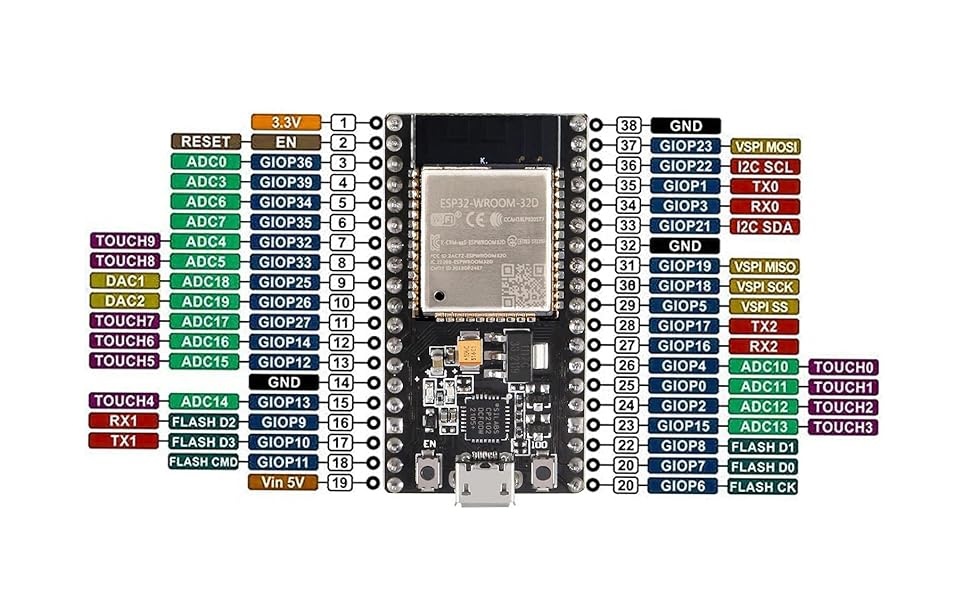
- Choose the right pins by referencing this tutorial
- Safe pins for input AND output: 13, 18, 19, 21, 22, 23, 25, 26, 27, 32, 33
- Even though the tutorial says they are available, don't use pins 16 and 17, they don't work in MicroBlocks because MicroBlocks uses those pins to communicate with the ESP32 serial port.
- Digital to analog pins: 25 and 26
- Analog to digital pins: 34 to 39
- Using WiFi, don’t use ADC2
- 34, 35, 36, 39 are input only
- 32-33 are always input/output?
- So much for General Purpose I/O
- Always triple check!
- (So much for "GPIO!")
Buying the "Right" ESP32
- MicroBlocks only works with the ESP32, ESP32-S3, and ESP32-C3 (there are many more versions that don't work with MicroBlocks)
- It's best to stick to the original/38 pin/25mm ESP32 model (the wider/30 pin/28mm ESP32 doesn't fit on a breadboard)
- When using an ESP32 with a breadboard, print this pinout chart (3" high) and use it as a template because the narrow version doesn't have pin numbers on top**
If you're not using MicroBlocks, there are more ESP32's and a whole YouTube video on the various types!